My Linux Driver Learning Journey

This article is migrated from Medium and translated by Gemini pro 2.5.
My previous jobs didn’t give me much opportunity to work with Linux. Now that I’ve encountered it, I’ve discovered it’s another vast world. I’m documenting what I learn here for my own future reference.
Understanding the OS
First is my understanding of an OS. The code I’ve written in the past either had absolutely no contact with hardware—like cryptocurrency trading applications, which are completely hardware-agnostic (these apps don’t need to manage hardware resources, as the OS handles it all)—or it was firmware that directly controlled hardware.
That latter category is the all-in-one code you write directly onto a microcontroller. You have to manage every single hardware resource yourself. If you make even a small mistake, the entire piece of hardware crashes and needs a manual power cycle to recover. Of course, I’ve used Real-Time Operating Systems (RTOS) like FreeRTOS on microcontrollers, but that was just using existing resources. I never dug into what the OS was actually doing.
Here’s my simple understanding of an OS. It’s mainly divided into two areas: Kernel-space and User-space.
The Kernel’s job is to operate the physical hardware: memory, hard drives, keyboards, mice, etc. Because every computer’s hardware is different, the kernel needs the help of drivers to operate all these different components. I’ll add more on drivers later.
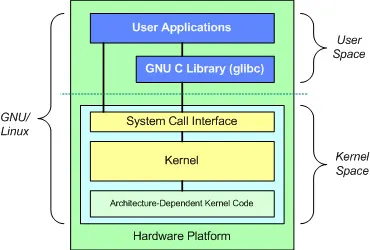
Another critical job of the kernel is scheduling. It’s this crucial scheduler that makes your computer look like it’s doing many things at once.
Imagine you’re writing firmware for a microcontroller to control two LEDs. One LED toggles its state (on-to-off or off-to-on) every 1 second. The other LED toggles every 0.5 seconds. The code might look something like this:
1
2
3
4
5
6
7
8
9
10
11
12
13
void main()
{
    int count = 0;
    while(true){
        led2.toggle(); //Toggle LED2 state

        if((count++)%2==0){ //Run every 2nd cycle
            led1.toggle();  //Toggle LED1 state
        }

        delay(0.5); //Delay 0.5 seconds
    }
}
This program has an infinite loop that runs every 0.5 seconds. When it enters the loop, it first toggles LED2. Then it checks if it’s the second iteration (or a multiple of 2), and if so, it toggles LED1. This basically achieves the requirement, but it has a few obvious problems:
- You need to find the greatest common divisor of the two LED frequencies. This example is simple, but if LED2 needed to toggle every 0.17 seconds, your loop might need to check every 0.01 seconds. A high-frequency loop like that will occupy a huge amount of CPU resources, and many of those empty cycles are an unnecessary waste.
- Scalability is an issue. This only considers two LEDs. What if you have 100 or even 1000 LEDs to manage simultaneously? Can you guarantee every LED toggles on time? What if you have other hardware to control besides LEDs? What if I need to support dynamically adding or removing hardware?
When you have many tasks that need to run concurrently, you clearly need a dedicated manager. This is what the kernel’s scheduler does. Each task is a Process. These tasks all need their own hardware resources and might even need to use the same resource. The kernel checks at very small time intervals whether to switch to executing another process. When this time-slicing is fine enough, it gives you the illusion that many processes are running “at the same time.”
Schedulers are also divided into many types based on their scheduling policies. If you need to achieve the “on-time” control mentioned above, you’d need an RTOS (Real-Time OS). But that’s another story.
Drivers vs. Firmware
Next up is the Driver part. As mentioned, the kernel needs to control different hardware devices across different platforms. Therefore, these drivers can’t be hard-coded into the kernel, as that would make the kernel’s portability terrible. The driver’s job is to sever the kernel’s dependency on specific devices, allowing the kernel to be ported to different machines independently.
I used to get device drivers and firmware mixed up, thinking that since both exist to control hardware, they must be more or less the same. But they are actually very different.
Firmware is a program written directly onto the hardware for the hardware to execute. You just need to understand the hardware you’re controlling well enough, write the corresponding logic, and you can bring the hardware to life. But you need to write a new piece of firmware for each piece of hardware, and that firmware usually can’t be ported to another microcontroller. You have to modify your firmware for each different chip. That’s why firmware is usually written for simple devices that don’t need to be ported often and won’t be switching main chips—like TV remotes, small RC toys, etc.
A Driver, on the other hand, can’t run on its own. Its job is to “introduce” the target hardware to the kernel, telling it what operations are available. It registers these operations as new capabilities of the kernel, essentially extending the kernel so that applications can also indirectly operate this new hardware. Because of this design, drivers give hardware much stronger portability. For example, your USB keyboard works whether you plug it into a Mac, Windows, or Linux machine. That’s all thanks to drivers.
My Learning Setup: Raspberry Pi
After all that introduction, it’s finally time to document my learning. To better understand drivers and the kernel, I decided on the Raspberry Pi as my target device.
I did this because if I were to develop on my main computer and accidentally crashed the kernel, my entire machine would freeze. Plus, adding custom hardware (like an LED) to a regular computer isn’t very convenient. The Raspberry Pi’s OS is also a Linux kernel, so this would also let me learn cross-compilation (if possible).

You can install the official Raspberry Pi OS (which is a Linux kernel) or Ubuntu. I chose the Raspberry Pi OS 64-bit Lite. I don’t need a graphical user interface, so “Lite” is fine. During installation, remember to enable SSH and configure your home Wi-Fi. That way, you don’t need to connect any peripherals—just plug in the power, and you can manage the Pi entirely via SSH. There are plenty of tutorials for this online, so I won’t go into detail.
The “Hello World” Driver
Once connected to the Pi, we can start writing a simple driver. Even though a driver is software that “introduces” hardware, you can actually write a simple one without any physical hardware, like a “Hello World” program.
Here is the code for hello.c:
1
2
3
4
5
6
7
8
9
10
11
12
13
14
15
16
17
18
19
20
#include <linux/module.h>
#include <linux/init.h>

MODULE_LICENSE("Dual BSD/GPL");
MODULE_AUTHOR("Bo Lin");
MODULE_DESCRIPTION("Simple insert/remove driver without any other function");

static int hello_init(void)
{
        printk(KERN_ALERT "hello driver insert\n");
        return 0;
}

static void hello_exit(void)
{
        printk(KERN_ALERT "hello driver remove\n");
}

module_init(hello_init);
module_exit(hello_exit);
Normally, we use the stdio library, but that’s for standard I/O. A driver has no concept of standard output, so you won’t see printf. For debugging, the kernel defines the printk function, which lets you send messages to the system log (which you can view with dmesg or in /var/log/syslog).
Also, unlike a normal program with a single main entry point, a driver registers several entry points with the kernel. This example registers init and exit. When someone uses insmod, the init function is called, registering the driver with the kernel. Conversely, rmmod calls the exit function to clean up all registered resources.
To compile the driver, we need to use make. For this example, we create a file named Makefile:
1
2
3
4
5
6
7
obj-m := hello.o

all:
        make -C /lib/modules/$(shell uname -r)/build M=$(PWD) modules

clean:
        make -C /lib/modules/$(shell uname -r)/build M=$(PWD) clean
When we call make, the system will compile the driver against the current kernel version, producing a hello.ko (Kernel Object) file.
This version of the OS doesn’t include the necessary files for compiling drivers, so you need to install them:
1
sudo apt-get install linux-headers
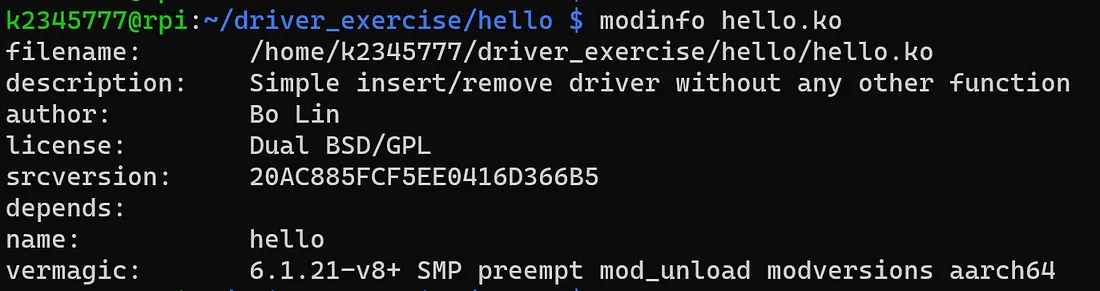
You can use modinfo to view the driver’s contents. This will show the author, description, license, and the kernel environment it was compiled for.
Finally, we can test the driver. We use two commands to install and remove it, respectively.
1
2
3
4
5
# Install driver
sudo insmod hello.ko

# Remove driver
sudo rmmod hello
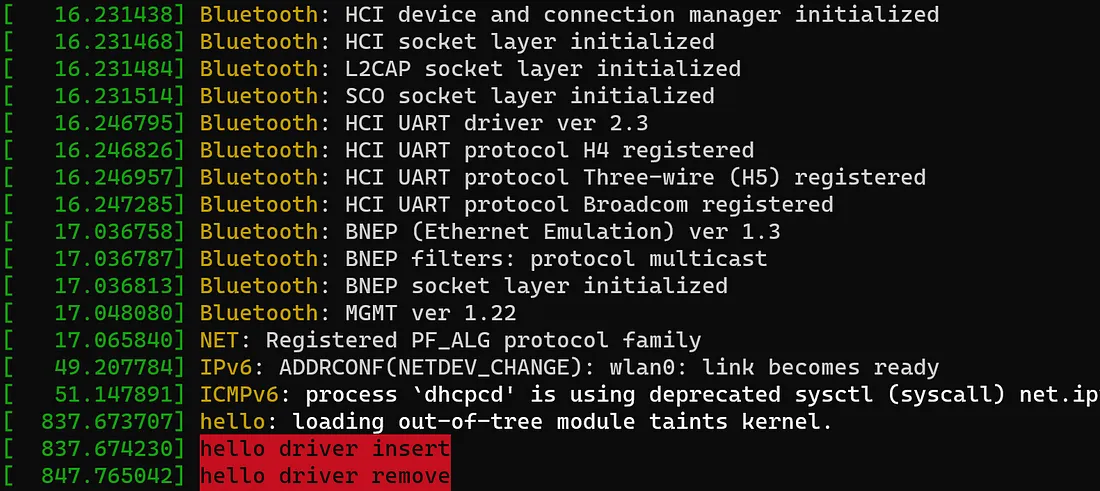
You’ll notice it looks like nothing happened. That’s because printk sends its messages to the system log. You can call dmesg to view the log. If everything went well, you’ll see the messages we left for it in our code.
Next Steps
From this simple “hello” driver, you can see that to create a driver, you first need a basic understanding of the kernel. You also need to learn basic Linux operations (both installation and Bash commands), and you need to learn Makefile to compile it. Then, you also need to understand your hardware, even though this example didn’t have any.
Next, I’ll try to drive a physical device, maybe starting with an LED. I also want to try cross-compilation, because this example was compiled directly on the Raspberry Pi. Separating the build platform from the test platform would be ideal.